Thursday, 12 May 2016
Thursday, 5 May 2016
Personal shoot 10- Work Diary
Location-
I used a naturally lit location that was bright and offered a warm glow, I felt that this would benefit the tone that I wanted to present within my photographs. I also felt that bright colours within the background and other aspects would work well with highlighting the beauty, whilst adding flavour of uniqueness compared to most plain beauty photography. Since I used myself as the model during this shoot I used a tripod to stand the camera on to ensure stability and so that it was constantly at the correct level to correspond with my height.
Camera set up-
I used an Olympus E-M5Mark11 camera with an Olympus M.12-40MM F2.8 LENS. I set the exposure to 1/25 secs, f/2.8 and the ISO at 200.
Photoshop-
I started by overlaying the two images of the model and of the makeup. Firstly I selected the image of the makeup copied and pasted it onto the photo of the model. This would cover the model image completely so that it can no longer be seen. Next I made sure the makeup photo thumbnail was highlighted so that I could adjust the opacity of the image, which would allow both images to be seen.

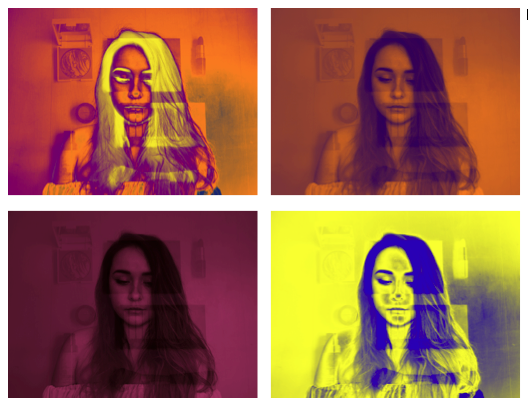
I then flattened the image so that anything I was to do next would happen to both layers. I changed the curves and levels to create more contrast within the photo. I then wanted to have a large colour influence within the photos. I liked the idea of creating my images using inspiration from Andy Warhol's Marilyn Monroe multiple imagery prints. Once the colour aspect of the image had been applied I decided to also use the multiple imagery technique.
Therefore, I created a new blank document selected an image using the select- all bar tab, copied and pasted. I did this for the four images.
I am happy with this last shoot and Personally rather like the Andy Warhol inspired aspect of some of my photographs as I feel that it uses a technique that has already had such a positive feedback from.
Personal shoot 9- Work Diary
Studio set up-
I wanted to use the technique of multiple flash within this shoot to portray the emotions behind beauty and the serious effects that societies idea of beauty has on people. To do this I used a black backdrop because I wanted the overall feel from the photos to be dark and slightly depressing, another aspect I used to achieve this feel is only using one light box. The one light box was placed towards the right hand side of the images and created shadowing and darkness, whilst still lighting the photo enough to see the different positions the model was captured in.
camera set up-
For this shoot I used a Nikon D300S with a 28.0-70.0 mm f/2.8 lens. I set the exposure to 2.5 secs, f/8 and ISO 200. All of these setting helped with the use of the technique of multiple flash to show my theme for this shoot.
Photoshop-
I kept the editing stages to this shoot rather simple due to the fact that showing physical beauty wasn't my intention, however to show the effects of beauty and having an obsession with beauty was. Therefore I started off by adjusting the curves and levels of the image. Then I changed the saturation to the image, I did this by selecting the image tab on the top bar, then selecting adjustments and saturation. I turned the saturation down so that the images had less colour in them. I experimented with the percentages I changed each image to because I wanted to try and show different emotions and degree of influence because for some people the pressure of obtaining beauty is bigger than others.
I am happy with how the images look and feel that exploring into the effects of beauty as well as physical beauty itself was enlightening and could possibly open the door to new shoot ideas for the future.
Friday, 29 April 2016


Subscribe to:
Comments (Atom)